
How to Set Up Klaviyo for Shopify (Without Wanting to Throw Your Laptop)
So… you finally decided to start email marketing for your Shopify store.
First of all: good choice.
Second of all: don’t worry — this is way easier than it sounds.
If words like “integrations,” “automation,” or “DNS settings” make you want to immediately close your browser and go eat snacks instead… you’re in the right place.
In this guide, we’re going to walk you through:
- How to create a Klaviyo account
- How to connect Klaviyo to Shopify
- What buttons to click
- What NOT to panic about
- And how to get everything connected in under 20 minutes
No tech degree required. Promise.
What Is Klaviyo Anyway?
Klaviyo is an email marketing platform built specifically for ecommerce brands.
In normal human language?
It helps you:
- Send emails to customers
- Recover abandoned carts
- Send discounts and promotions
- Build customer loyalty
- Make more sales while you sleep
And since Klaviyo works really well with Shopify, it’s one of the most popular email marketing tools for online stores.
Before You Start
Here’s what you’ll need:
✅ A Shopify store
✅ About 15–20 minutes
✅ Coffee (optional, but encouraged)
Step 1: Create Your Klaviyo Account
Head over to:
Click the big “Sign Up” button.

You’ll Be Asked For:
- Your name
- Business name
- Email address
- Password
Nothing scary here.
After signing up, Klaviyo will ask you a few questions about your business.
You can answer them honestly or just click through them quickly like the rest of us do when signing up for literally anything online.
Step 2: Verify Your Email
Klaviyo will send you a verification email.
Open your inbox and click the confirmation button.
Boom. You’re officially in.
(You’re basically an email marketer now.)
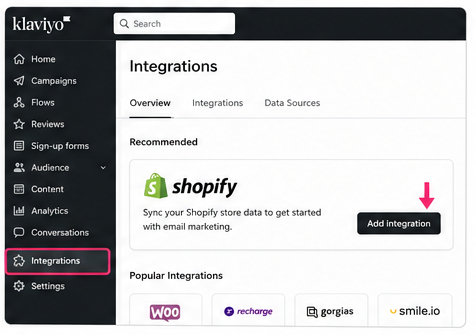
Step 3: Connect Klaviyo to Shopify
Now for the important part.
Inside Klaviyo, look for:
Integrations → Shopify
Or Klaviyo may show Shopify immediately on your dashboard.
Click “Add Integration.”
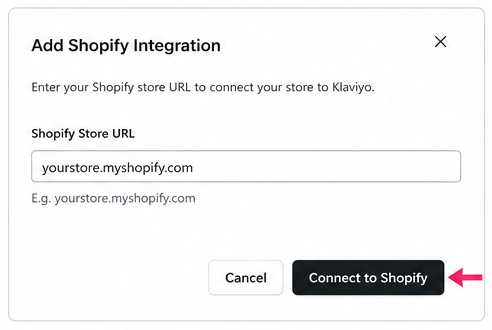
Step 4: Enter Your Shopify Store URL
Klaviyo will ask for your Shopify store URL.
It usually looks something like this:
yourstore.myshopify.com
Paste it in and click Connect to Shopify.
Step 5: Log Into Shopify
Shopify will open and ask you to approve the connection.
Click:
✅ Install App
That’s it.
Seriously.

Step 6: Wait for Your Data to Sync
Now Klaviyo and Shopify start talking to each other behind the scenes.
Klaviyo will begin syncing:
- Customers
- Orders
- Products
- Checkout activity
- Email subscribers
This can take a few minutes depending on how large your store is.
Don’t panic if things look empty at first.
That’s normal.
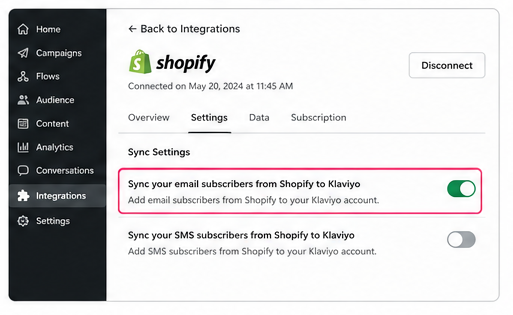
Step 7: Turn On Email Subscribers Sync
This part is VERY important.
Inside the Shopify integration settings in Klaviyo, make sure this option is enabled:
✅ Sync your email subscribers from Shopify to Klaviyo
Otherwise, customers who subscribe on your website may not get added correctly.
And that would be… not ideal.
Step 8: Install the Klaviyo Onsite Tracking Code
Good news:
Most of the time, Klaviyo automatically installs this for you.
But it’s worth double-checking.
Inside Klaviyo:
- Go to Integrations
- Click Shopify
- Scroll to onsite tracking
If tracking is active, you’re good to go.
This tracking helps Klaviyo see:
- Product views
- Added-to-cart events
- Customer behavior
AKA the magic stuff that makes automated emails work.
Step 9: Create Your First Email List
Now let’s give your future subscribers a home.
In Klaviyo:
- Go to Lists & Segments
- Click Create New
- Choose List
Name it something simple like:
- Newsletter Subscribers
- VIP Customers
- Store Subscribers
Done.

Step 10: Celebrate — You Did It 🎉
Your Klaviyo account is now connected to Shopify.
You officially have:
- Email marketing software
- Customer syncing
- Subscriber tracking
- Ecommerce automation capability
And you didn’t even have to call your “tech friend.”
We’re proud of you.
What Should You Do Next?
Once Klaviyo is connected, here are the FIRST emails we recommend setting up:
1. Welcome Email
Sent automatically when someone subscribes.
2. Abandoned Cart Emails
Recover customers who almost bought something.
(These emails alone can make stores a LOT of money.)
3. Post-Purchase Emails
Thank customers and encourage repeat purchases.
4. Campaign Emails
Sales, promotions, launches, holiday offers, etc.
Final Thoughts
Starting email marketing can feel intimidating at first — especially if you’re not super technical.
But honestly?
If you can run a Shopify store, you can absolutely handle Klaviyo.
And once it’s set up, email marketing can become one of the highest revenue-generating channels for your business.
Not bad for a few clicks and some automated emails.
Need Help Setting Everything Up?
If you get stuck, overwhelmed, or simply don’t want to deal with all the setup stuff yourself…
We can help.
Our team specializes in:
- Klaviyo setup
- Shopify email marketing
- Welcome flows
- Abandoned cart automation
- Email design & copywriting
- List growth strategies
So instead of spending hours Googling tutorials and clicking random settings…
You can let the pros handle it for you.
👉 Contact us today and we’ll help get your email marketing running smoothly.


